Saturday, July 18, 2015

July 18th, 2015: The Mountain Takes Shape! (PART 1)

It's been a very busy couple of months.  After finishing the town we started working on the mountain.  It was just two platforms with foam on them, so we had to give it elevation, topography and, most importantly, a waterfall.  The waterfall was something we knew we wanted on the layout since its inception and the hour was at hand to make it.


The mountain had additional 2" foam added to it and then was carved to include a stream that flowed to where the waterfall was to be.  Landscaping is being added to it to give it a base for the trees that will go in later.


One of the other issues we had to deal with was connecting the roads from the west side of the layout to the manufacturing area on the north side.  In order to make this work, we had to engineer bridge crossings over a track and over the stream in front of the waterfall, where the covered bridge will eventually go.  This required a great deal of foam to build some of the areas up six inches higher or more from the last bare areas of homasote.  The bridge in the above photo was designed on a simple web-based CAD program (Tinkercad) and then sent to Shapeways to make out of 3D-printed plastic.


The waterfall was made from clear silicone caulk streaked with glass fiber "angel hair".  The caulk was laid onto a piece of wax paper and spread out with a metal painter's spatula, angel hair placed on top and then a second layer of silicone spread on top of it.  The spatula was used to etch texture into the silicone before it dried.


Sunday, May 10, 2015

May 10th, 2015: The Mountain Begins Construction

With the populated areas complete, it was time to begin work on the mountain.  It is the last major area on the layout that we have to work on outside of the 4'X3" bump out area.  The trains are all programmed onto JMRI for computer control and it is now time to raise the cliffs!

So two areas were carved.  One was the portal entrance on the southwest side of the roughed-out mountain and another next to it.  Once both areas were carved, gypsumed, painted and installed, they had to be reconciled where they met so some more gypsum and paint were added.


Once that was done, it was time to add foam to the top of the mountain platforms and start carving.  Today the facade for the waterfall was installed using carefully measured and cut 2" foam, liquid nails and pins.


It felt odd to put those pieces of foam on that empty area.  It's been more or less unchanged for the last two years and sealing it up makes the fact that the end of the build is coming undeniable.  A multi-level waterfall will be put in here.  The carving will continue, continuing the cliff line and putting in a stream up above to flow into the waterfall in the coming weeks.  Liberal use of our large amount of Fusion Fiber will help with sealing the cracks between the foam pieces but that will not be until later this summer.

Saturday, January 17, 2015

You Are Now Entering Fred

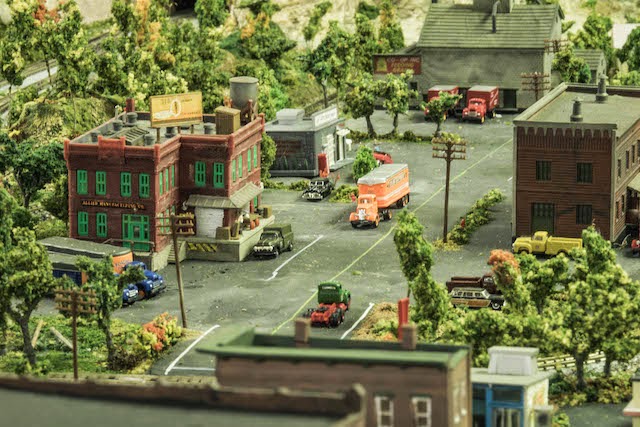
The town has really come together.  We'll be putting in more detail pieces over the next year or so but now we are going to tackle the mountain on the northwest corner of the layout.  Here are some shots of what we've been able to accomplish in town!

First, here is the town from an aerial view.  The buildings are mostly Woodlands Scenics, assembled and painted painstakingly.  Some are pre-built and painted buildings acquired from train shows.

 The southwestern part of town, on the other side of the tracks.


 Awaiting the opening!  The lamppost is Woodland Scenics as well, made of pewter and hand-painted.  The people came in bulk from China.  The sidewalk is an interesting story...the areas where the buildings are were islands of 1/4" foam with gaps for the roads.  I used a few different materials to fill in the road, starting with WS Smooth-It System.  I didn't care for it, it left a lot of lumps and gaps so I filled in with gypsum and then first used a flat chisel and then sandpaper to smooth it down.  I left enough of the foam to form the curbside.  The lines were made with paint pend purchased at Michael's.  The road was painted with WS Asphalt paint.  The sidewalks were first painted with WS Concrete but it didn't look realistic.  I repainted with WS Stone Grey and then dry-brush stippled white paint onto the gray to give it the worn pavement look.  It was tedious work.


Once the base work was done, my dad positioned the buildings and glued them in place.  He glued in the small detail features, including dumpsters and fire hydrants that were Shapeways 3D-printed items.  He also placed the people and telephone poles.  We may or may not put thread between the poles at some point but now we let imagination do the work.


The drive-in on the lower left of the above photo was originally on a base.  My dad removed the base.  It was very painstaking work but the end result works.


We have used up our Metal Works cars and now need to order plastic cars because Metal Works' selection is pretty much exhausted and it's getting expensive to get them.


It's always summer in Mina County!  Even in the dead of January.


Sunday, November 2, 2014

November 2nd: Long time coming...

I have been having a lot of trouble posting to Blogger.  It's been a long time since I've been able to post an update.  Anyway, here goes!  I'm trying this from another computer.

We have nearly completed the farm.  We've put in a plowed field on the south side of the stream and a cow pasture on the north side.  The cow pasture is surrounded by a split-rail fence and there's a barbed-wire fence headed down to the creek to keep the drinking cows penned it.  We have made the track over the stream a viaduct with concrete drainage pipes feeding the flow from the upper stream down to the lower.  A scratch-built bridge will provide a way for the farmer to get across the stream with his tractor.


Here is the west side of the cattle area.  Note the scratch-built cattle grate made from leftover pieces of other kits, the hedgerow and then split-rail fence.


The cows are happy in their field!


Note here the dump truck and the spilled hay on the ground.  Getting people glued into the layout has been quite a challenge but we're getting it done.


And, just for fun, a shot of the area we spent months working on earlier this year.  I took all of these photos with the iPhone 6 Plus.  Takes great photos. 

We have also finally finished the pavement on the roads in the town and painted them.  We will work in a commercial area on the southwest side of town next.  We are going to get WiteOut pens and use them to draw the lines on the roads and parking lots.  Should make putting the lines down a little easier than just painting them.  If that doesn't work, we'll check out Michael's to see what kind of paint pens we can come up with.  More to come, so keep checking back!

Wednesday, August 13, 2014

"After" Photos From Last Post

We reset the tracks using Fusion Fiber.  It worked like a charm.  No more derailments!

Here, the Fusion Fiber is being laid to support the track.


"Before" Photos From Last Post

So, I have been trying to upload photos to the blog for months now and have had no success.  So I am posting this using the Chrome browser.

So this is Track 1, having been pulled up to reset to try to fix the derailing issue.


Sunday, August 3, 2014

August 2nd, 2014: Moving Back To The Track

So we have been spending a great deal of time working on landscaping so we decided to start August by cleaning the tracks, running the trains and trying to fix some issues that have been plaguing us for quite some time.  The last time we worked on the electrical, we found that some wires had snapped from their connections and there was a short circuit somewhere.  Another issue that has been driving us nuts for the last year or so is that on the southwest part of our outer track (Track 1), as the train comes down past a switch and around a curve, the back truck of the loco would kick out and when it hit the double crossover track it would derail completely.  A solution has been found!  We tore the track up and cleared the landscaping from around it and then reassembled it and let the train run on it without securing it to the foam...and the derailing no longer happens!  So we made use of Fusion Fiber to secure the track in its naturally stable state and redo the landscaping at the same time.  Result?  Our longest-standing issue with the layout has finally been resolved.

Photos will be coming in additional posts.  Blogger is not allowing me to save with photos on this post!